


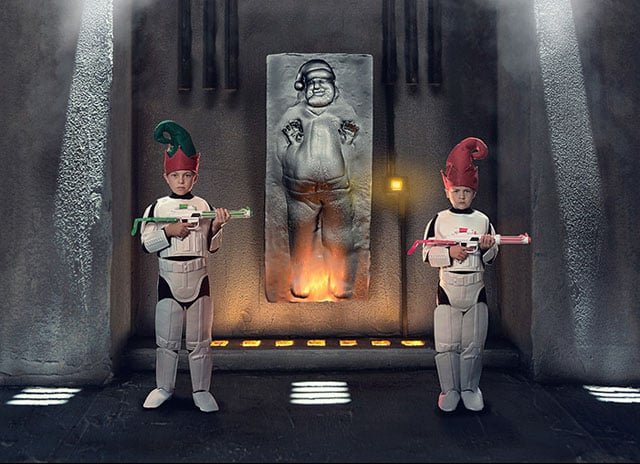
Here’s my 2014 Christmas card: Santa in Carbonite! At the end of every year my studio collects all of the cool card ideas that we thought of during the season. I then create a calendar event for the next November, listing out the ideas we thought of. Last year we came up with a Star Wars Christmas card idea with the boys guarding Santa Claus, frozen in carbonite. Call them Imperial Elves.
Building A Set
To create this image I decided to build a miniature set in my studio. It was about 18 inches tall, and I used mostly balsa wood to build it. For the platform lighting I connected some USB led lights and then gelled them orange.


To get the concrete texture, I used a product by Liquitex called Ceramic Stucco. It’s great at producing a gritty, concrete-like texture to a surface. After applying it, I used a combination of Liquitex Basics paints and airbrushing to get the worn effect.

With all of the texturing and painting done, I tried out a few angles to see what worked best (you can see one angle with the camera below). Ultimately I decided on a front view, as it provided a nice symmetry to everything.


Lighting
For lighting, I looked at stills from the original movie. There were overhead vents that had light spilling through them, raking across the walls, hitting the floor. To accomplish this I created a simple roof with the vents cut out. I placed a 580EX flash overhead with no diffusion, and adjusted the ceiling and light location until I got just the right amount of ‘rake’ across the walls and floor. I placed a flag over the sit to keep the light from the 580EX from hitting the rest of the area. I just wanted it to come through the overhead vents. I also had a soft front light to serve as a general fill.
The exposure was long – 3.2 seconds, f/10, ISO 100. This gave me a good balance between the flash light coming in and the glow of the USB lights. Here’s a diagram of the lighting setup.

Creating Santa
To create our frozen Santa, I found a 3D model online of Han Solo frozen in a block of carbonite. I took that model into Cinema 4D and used its sculpting tools to turn Solo into jolly old St. Nick. I left some of the face details so that it still looked like Han a little bit.
In Cinema 4D you set up a camera and lights like you do with a real shoot. So, I simply matched everything to how I had lit the set (shot at 35mm). I also added in two glow lights (one at his feet and one to the right side to mimic the light coming from the control panel).


‘Principal Photography’
Photographing the boys was pretty straightforward. I had a soft light for fill. I also ran an overhead strip to simulate the vent light, as well as an orange-gelled floor light to simulate the glow from the platform behind them.

Once all the elements were photographed and rendered, I took everything into Photoshop for compositing. I did some touch-ups to the walls and platform grates, and I added some smoke from the top. Here’s a shot of how the retouch was coming along before I cropped it:

And here’s the back:

Would J.J. approve? I hope so!
This was just one of the cards I created this year. You can find a collection of my holiday card photos at AustinChristmasCards.
About the author: Eric Doggett is a photographer based in Austin, Texas. He is the owner of Eric Doggett Studios. This article originally appeared here.
 Started out doing photography at the age of 6 using an uncle's old 1940 kodak brownie box camera. At 15 years of age, I decided to buy my very own 1975 Praktica SLR camera. I now shoot with a Nikon D850. I do unpaid TFP and commercial paid work.