


How to Properly Resize Images in Lightroom
If you like sharing your photographs online, whether on Facebook or on your own blog, you should learn how to properly resize your images in Lightroom. While your camera can take very high-resolution photographs, you might sometimes need to down-size or “down-sample†those images, not only because most websites won’t accept large images, but also because making those images smaller might actually make them look better, if done correctly. In other cases, you might need to up-size your image resolution, say for printing purposes. In this quick tutorial, I will show you the proper way to resize images in both Lightroom Classic CC and Lightroom CC.
A separate article on how to do this in Photoshop can be found in my “how to properly resize images in Photoshop†article. I use the below method when exporting images out of Lightroom. You can employ this technique to any photograph – whether it is a portrait or a sweeping landscape.
When I wrote about the benefits of a high-resolution sensor, I used the word “down-sampling†when talking about reducing noise and increasing sharpness in high-resolution images. While resizing generally refers to increasing or decreasing image resolution, down-sampling only applies to image reduction.
When an image needs to be increased in resolution, the up-sizing process can be referred to as “upscaling†or “upsampling†as well, although these terms aren’t used as often.
Table of Contents
Why Resize Images?
Why would you want to resize an image? Your camera is a very advanced tool and it contains millions of pixels. This is good if you want to print your images, but what if you want to share those photographs online? Many websites won’t even let you upload high-resolution images, while others like Facebook will down-size them for you, automatically lowering the resolution and quality of those photographs. Because this automated photoreduction process is often not optimized for the best quality, it can make your resized photo appear soft and might even result in a loss of colors (when using lossy JPEG compression). To prevent that, it is always a good idea to properly resize your images before you use them online. This way, you are in full control of how your photo looks.
Lightroom Image Resizing Workflow
Lightroom greatly simplifies the image resizing process. Here is my simplified workflow process:
- Import images into Lightroom
- Make necessary adjustments to the image I want to resize
- Apply sharpening to the full-sized image via the Detail Sub-Module
- Export the image in sRGB color profile with specific sharpening settings
I use the above process most of the time and resort to my much more complicated Photoshop resizing process only when working on select images that I want to showcase.
Lightroom Classic CC Image Resizing Process
- Select an image or multiple images you want to export out of Lightroom Classic CC, then either go to File->Export or press CTRL+SHIFT+E (CMD+SHIFT+E on Mac) on your keyboard. The export window will come up that looks like this:
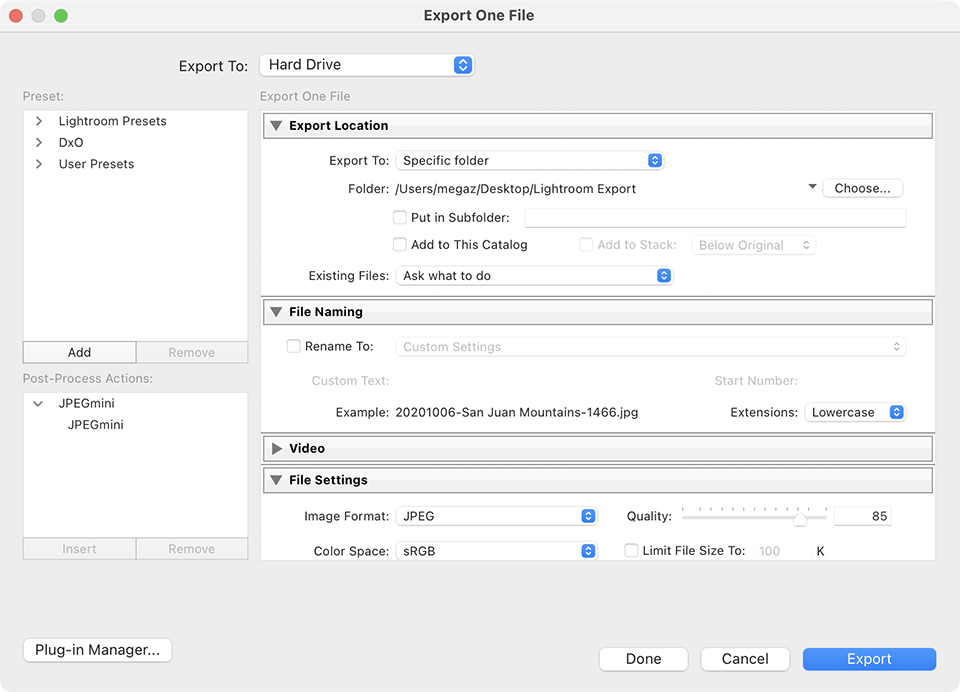
Let’s me go over each section.
- Start out from “Export Location†and choose “Specific folder†from the drop-down. Next, click the “Choose†button and select a folder on your computer where you want the exported files to go. I set mine to a folder called “Lightroom Exportâ€, but you can choose whatever you want. Some people export to their Desktop and then check “Put in Subfolder†and type a different name every time they export. Whatever works for you. For “Existing Filesâ€, I have set mine to “Ask what to doâ€, so that the system asks me what to do if a file is already present in my export folder.
- Under “File Namingâ€, if you check “Rename Toâ€, your exported files will be renamed to something different. I usually rename my files during the import process and I don’t touch this setting. This way, the file names I have in my system match the export file names. If I need to re-extract an image for whatever reason, I will know which one I will need. “Extension†does not matter – I set mine to “Lowercaseâ€.
- The next section is very important. This is where you manage the file quality and set some important parameters:

When exporting images for the web, you should always choose “JPEG†as the file format. Right next to it there is a “Quality†slider. I have seen some people slide it all the way to the right, thinking that it will preserve the best quality. Well, it does, but it also results in humongous image sizes! I typically have set mine between 65 and 84. On rare occasions when I need to print I might pick a higher value, but never for the web. In case you are wondering how this value impacts the image size and quality, check out my article “JPEG compression levels for Photoshop and Lightroom“. Basically, these percentages work in ranges, so if you set it to 77% or 84%, the resulting file size and quality will be identical.
Next, set “Color Space†to sRGB – that’s what most devices on the Internet are able to see properly. Leave “Limit File Size To†unchecked.
- Under “Image Sizingâ€, make sure to check “Resize to Fit†– this is what actually resizes the image to a smaller version for the web. I usually set mine to “Long Edgeâ€, which limits the width or height of the image (depending on whether it is horizontal or vertical) to a certain value. That value you set right under, in the first input field. I typically use “2048†pixels, which is a good size for the web, but it is up to you if you want to go smaller or larger. Don’t use a high number here, because it will result in a huge file; plus, most websites won’t allow you to upload huge images anyway.

The part that many people seem to be confused about, is “Resolutionâ€. That setting has absolutely no meaning when exporting your photos for the web. You can set it to any number you want, 1 being the smallest. Whatever number you type in, Lightroom will simply write that number into the file as a reference for printing purposes. If anybody decides to print your image, their printer will most likely default to this resolution / DPI setting. But it really doesn’t matter, because DPI can be changed at the time of printing anyway. I leave mine at 72 pixels per inch, which is the default.
- The next “Output Sharpening†section is very important. This is where you set the amount of additional sharpening Lightroom should apply to images after they are exported. If you have already applied sharpening in Lightroom’s Develop module, keep in mind that exporting your image at 100% resolution (without resizing) with the “Sharpen For†setting checked will result in additional sharpening applied to your image.

In this case, since you are reducing the resolution of the image, your Lightroom sharpening settings don’t really matter. When exporting landscape images, I typically set my “Output Sharpening†to “Screen†and I choose “High†for Amount. For portraiture, I limit the amount to “Standardâ€.
- The last three sections are called “Metadataâ€, “Watermarking†and “Post-Processingâ€:
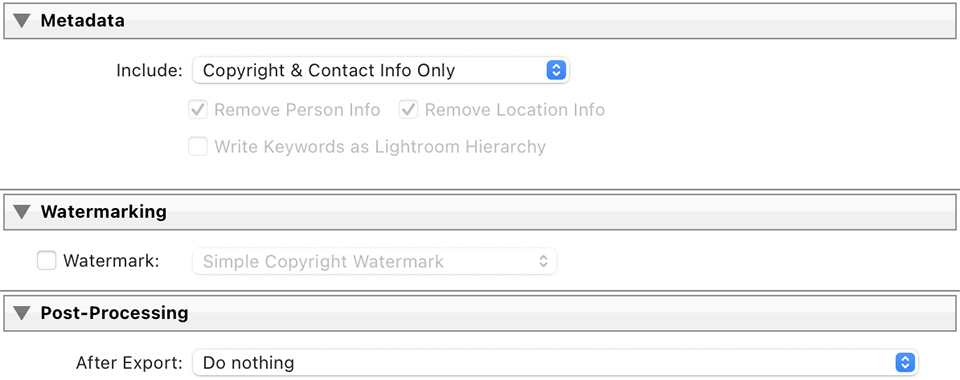
When exporting images for the web, it might be a good idea to limit the amount of metadata that gets extracted with your image, so that sensitive data such as your camera settings, Lightroom adjustments and your GPS location are excluded. My recommendation would be to only include your copyright and contact information, while everything else is stripped out. If your intention is to leave some metadata / EXIF information for your viewers, then see my “EXIF data†article – I show how to selectively strip EXIF data in that article.
- If you have a watermark you want to use, pick the right one under “Watermarkingâ€. If you want to find out how to add a watermark in Lightroom, see my “how to watermark a photo in Lightroom†article.
- Lastly, leave “Do nothing†under “Post-Processing†-> “After Exportâ€.
Once you are done, just click the “Export†button at the very bottom of the window and the image(s) will start exporting.
Once you set the settings in this window, Lightroom will always remember them, so you can reuse the settings without having to modify them each time.
Lightroom CC Image Resizing Process
If you use the cloud version of Lightroom called “Lightroom CC†on your computer or your mobile device, the image resizing process is going to be different.
- Select an image or multiple images you want to export out of Lightroom CC, then either go to File->Export or press SHIFT+E on your keyboard. The export window will come up that looks like this:
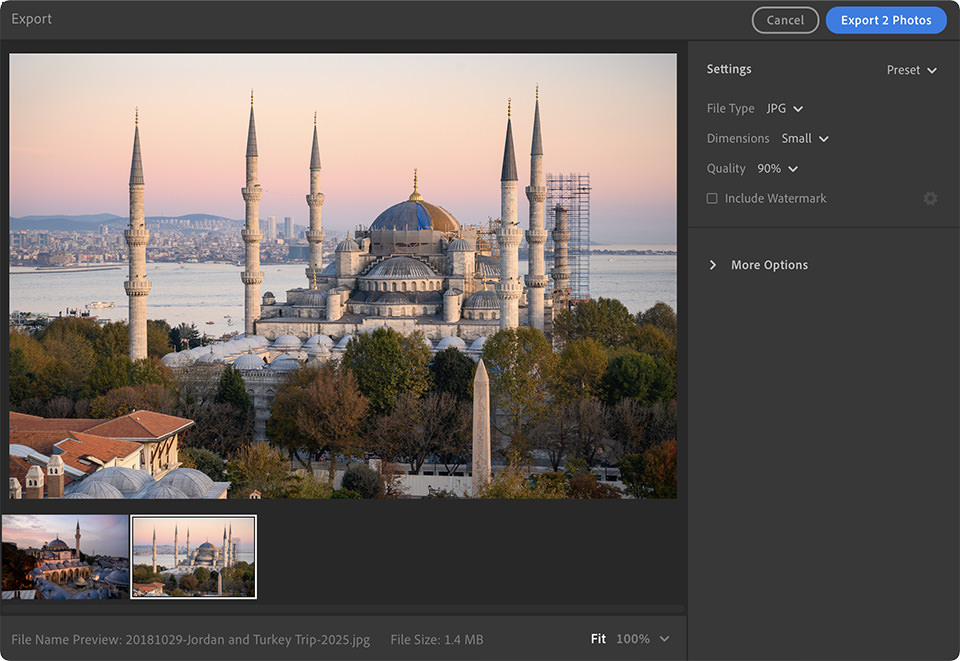
As you can see, the export window looks very different from the one in Lightroom Classic CC. The window is much more simplified and you only have a few settings to choose from.
- On the right side, you will see a “Preset†drop-down with simple presets that set particular export sizes like “Export JPG (Small)â€, “Export JPG (Large)†and “Export Originalâ€. Don’t worry about these presets, since they don’t show the exact resolution and might change over time. Instead, go through each setting individually.
- Under “File Typeâ€, make sure to select “JPGâ€:
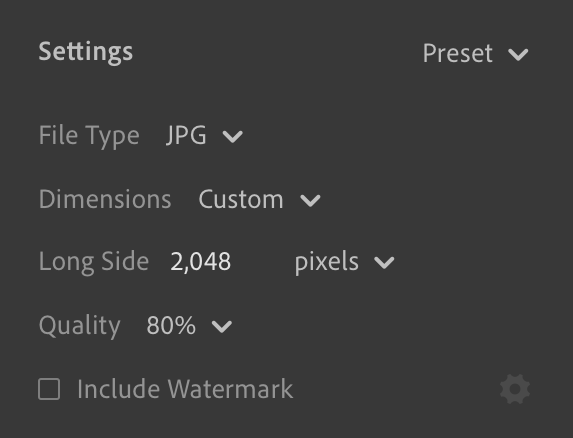
Set “Dimensions†to “Customâ€, which will reveal an additional setting below where you can enter the Long Side of the image. I set mine to 2048 pixels. Set “Quality†to something like 80%, but feel free to change this to a different setting, depending on your requirements. For web use, 80% is plenty, but if you need to print an image, I would recommend setting it to 100%. Leave “Include Watermark†unchecked, unless you want to add your watermark to the exported image(s).
- Click the “More Options†drop-down to reveal more settings. To exclude all the camera and Lightroom settings, as well as your GPS location, make sure to select “Copyright Onlyâ€. Under “File Namingâ€, set it to “Original†to preserve the original file name:
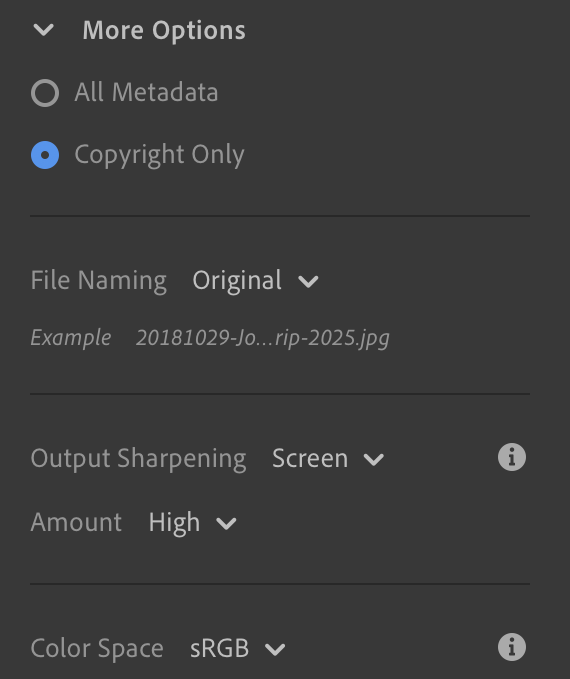
The most important setting here is “Output Sharpeningâ€. To make sure that your image is properly sharpened, make sure to set “Output Sharpening†to “Screenâ€, with the amount set to “Highâ€. If you find the exported image looking too sharp for your taste, you can lower it here.
- Lastly, set the “Color Space†to “sRGBâ€.
- Click the “Export Photo(s)†button on the top right of the window to export the selected image(s). Lightroom CC will prompt where you want these images saved, so you can choose your export folder.
That’s all there is to it.
Why You Should Never Use Lightroom to Upsample Images
As you can see from this article, I only provided information on how to down-sample images in Lightroom. You might be wondering why I did not provide any information on image upsampling – the process of increasing image resolution beyond the original. If you set the image resolution larger than what you have in the original file, you will end up with a blurry photo. That’s because Lightroom does not have any advanced features for proper image upsampling!
For this reason, you should never upsample / upscale images in Lightroom. Instead, use software like Adobe Photoshop or other third-party software that is designed for being able to handle image upsampling.
If you have any questions about any of the above, please let me know in the comments section below!
 Started out doing photography at the age of 6 using an uncle's old 1940 kodak brownie box camera. At 15 years of age, I decided to buy my very own 1975 Praktica SLR camera. I now shoot with a Nikon D850. I do unpaid TFP and commercial paid work.