


How to Correct Purple Fringing in Photoshop
A couple years after starting my business, I received a large print from my lab. Upon checking it, I noticed a problem with the print that was so blatant I couldn’t deliver it to my client. At first I thought the lab made the mistake, but nope. It was a problem created by my digital camera when I took the shot! It’s more than likely you’ve already noticed it in your images.
The problem is called purple fringing. In this article I’ll go over what it is, how to prevent it, and how to get rid of it.
What is Purple Fringing?
Purple fringing is when you get purple color in high contrast boundary areas in an image that was most likely taken in low light situations with a brighter background. It is most often attributed to a chromatic aberration that occurs commonly with digital cameras, but purple fringing can also be caused by lens flare.
How can you prevent getting it?
- Avoid shooting with your lens wide open in high contrast situations.
- Get a UV filter for all of your lenses.
Unfortunately, these actions don’t always resolve fringing problems, but it can prevent it from happening some of the times.
Purple fringing
Example image:Â You see it mostly in the branches and the edge of the roof.
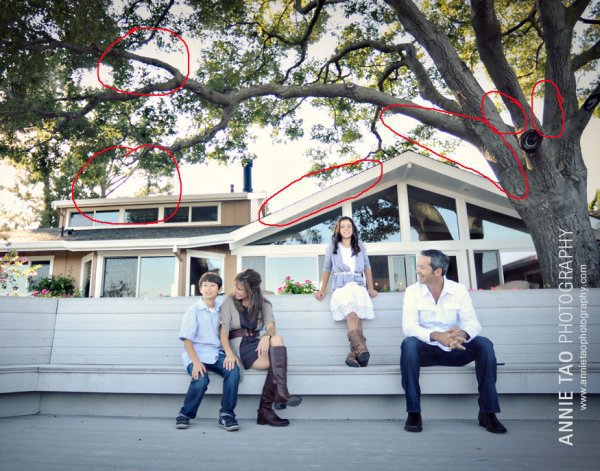
FYI:Â I used my 14mm ultra wide lens for this shot. The lens looks like a fisheye lens with its bulging curvature, so it is not possible to put a lens filter on it.
Close-up view of purple fringing:

The image AFTER correcting it in post-processing:

Close-up view AFTER correcting it:

Steps to correct purple fringing in Photoshop:
Step One:
In Photoshop, click on “Adjustments†under the “Image†tab.
Step Two:
Select “Hue/Saturationâ€. (Or you can do this as an adjustment layer as well in case you need to mask off some areas later).

Step Three:
Where you see “Masterâ€, click on it and select “Blues†to get to the blue channel.
Step Four:
Once you’ve selected the specific color channel, you will have the eyedropper tool. Select the left-most eye dropper.

Step Five:
Then click on one of the areas in your image with purple fringing. I chose the tree branches on the right as they were one of the most prominent problem areas.
Step Six:
Next, go to the Saturation slide bar and move the slider to the left. Usually somewhere between -70 and -80 works best, but the exact number depends on the image and the amount of fringing.
Step Seven:
Lastly, check your image to see if you need to adjust anything else since reducing one color may effect the rest of your image. (If you’ve use an adjustment layer you can mask out the parts you don’t want effected)
There you have it! You’ve zapped away the purple fringe!
Read more on how to fix chromatic aberration here:
Source Article from http://feedproxy.google.com/~r/DigitalPhotographySchool/~3/zVhAu04xiwQ/
 Started out doing photography at the age of 6 using an uncle's old 1940 kodak brownie box camera. At 15 years of age, I decided to buy my very own 1975 Praktica SLR camera. I now shoot with a Nikon D850. I do unpaid TFP and commercial paid work.