Levitation Photography 7 Tips for Getting a Great Image
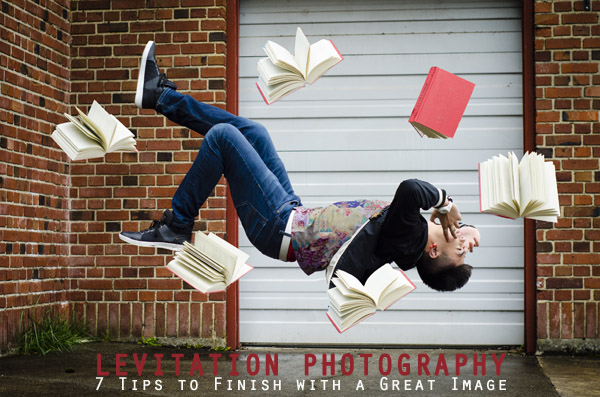
Levitation images are magical! They draw the viewer in and make them think about what’s not quite right. If you search the internet for levitation photography, you will find amazing examples. However, levitation photography hasn’t become wildly popular yet. I assume it’s because levitation photography looks really difficult. I think most people would be surprised to learn that in its most basic form, it’s just compositing two or more images in editing software.
Like most portrait photographers, I shoot what I’m good at, and mostly stay inside my little portrait box. Recently, I decided I needed to get my creative juices flowing again and get out of my comfort zone. Levitation photography caught my eye. I learned the basics of how to create such images from posts like this: How to Shoot a Mysterious Levitation Photo.
My first levitation experiment was rough, to say the least. I knew the basics of how to accomplish a levitation photograph, but the images turned out mediocre. The best part though, was coming home after the shoot and writing down all the things I had learned to make my levitation images better for the next time. Below, you’ll see the lessons I learned, so you don’t have to learn the hard way.
Preparing for the Shoot
Tip #1 – Gather Your Equipment
In order to create a levitation photograph, you must have: a camera (that has manual focus capabilities), a tripod, a willing model, a strong fan (if your model has medium to long hair), and something to prop your model up (a stool, chair, or ladder). If you have a camera remote, bring that along too.
Tip #2 – Tell Your Model What to Wear
Clothing can make or break a levitation image.
- Solid color clothing is best. Prints and patterns can make it difficult if you need to clone out certain parts of clothing or liquefy fabric.
- Tell your model not to wear a jacket or sweater. Anytime the model lays upside-down, or sideways, the garment should be hanging down. But if he/she is laying on a stool, the jacket won’t be able to naturally hang leaving the image looking less realistic.
- If you’re going for a feminine levitation shot, long dresses, skirts, or extra flowing fabric can help create the look you’re going for.
Tip #3 – Shoot on a Cloudy Day
Sun and harsh shadows have the potential to create a lot of extra work for you in post-production. Editing out the stools and ladders, yet keeping a realistic shadow of your subject can turn into a job for Photoshop experts.
During the Shoot
Tip #4 – Shoot from a Low Angle
You will want to shoot from a low perspective to give the illusion that your subject is high in the air. However, be mindful of how low you are. If you are lower than the prop your model is standing/laying on, the prop will block parts of his/her body. It is safest to shoot in line with the top of the prop your model is on. Having your model situated at the very front of the prop will also lessen the chance of cutting into the body.
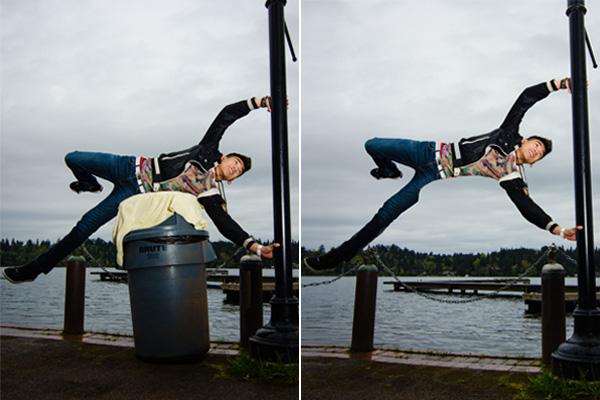
When I erased the garbage can, parts of the model’s body looks like it went missing since it was hiding behind the garbage can.
Tip #5 – Always Photograph the Empty Background
When preparing to photograph the frames that will create your final levitation image, follow these steps.
- Set up your shot with your model in the frame.
- Plan the angle you are going to shoot from and set up your camera on the tripod.
- When your model is in place, choose the focus point on your subject.
- Set your camera to manual focus and don’t touch it!
- Take the different shots suggested below, in Tip #6, without moving your focus point or your camera.
- After you’re sure you’ve captured all the images you need with your model and props, remove EVERYTHING from the scene. Photograph ONLY the empty background. This is the most important image you will take.
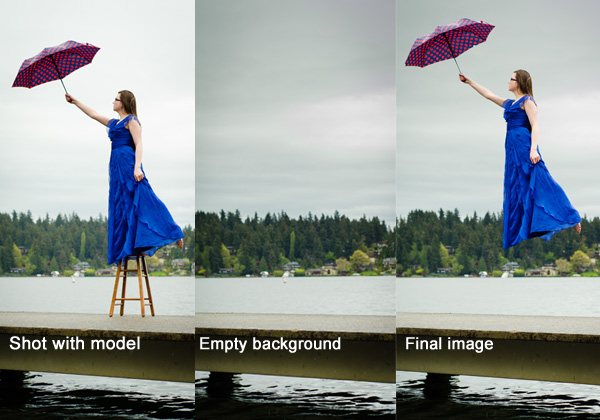
Tip #6 – Take Multiple Shots to Create One Image
The most basic levitation image is a composition of two or more frames. At the bare minimum, you will need at least a shot of the background and one of the model in that background.
Most great levitation images use a few more frames to add interest and make the final image more provoking. Here is a list of some shots you might want to take all without changing the focus and position of the camera:
- Model on the prop(s) – the focus of this shot is on what the arms, legs, and body are doing.
- Hair and facial expression – the focus of this shot is to capture the models expression and hair moving like it would naturally if the model was really in that position (floating straight up, blowing behind her, etc.). *Hair dryers and small fans are not strong enough to propel hair in specific directions. The longer and heavier the hair, the more powerful the fan needs to be.
- Clothing – the focus of this shot is to capture the movement of the clothing (if needed). If your model is being pulled one direction, what direction should the loose fabric be moving?
- Additional props – the focus of this shot is to photograph any extra props you want in the picture (if desired).
- Empty background – see Tip #5 above to learn more about the importance of this shot.
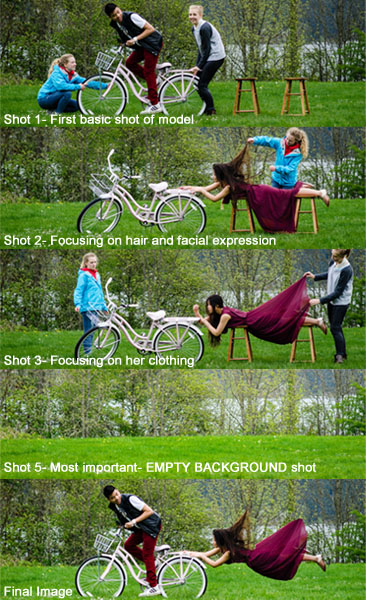
Shot 2 is a perfect example of how a strong fan would have made the shot more realistic with her hair blowing behind her instead of being held up by an assistant. We did not need to photograph additional props for this image, therefore, we did not do a “Shot 4″ for this composition.
After the Shoot
Tip #7 – Putting the Images Together
Many levitation photographers use Adobe Lightroom and Photoshop to create their final images. Regardless of your software choice, it is recommended to first color correct the series of shots so they are all the same. Lightroom has a great “sync†feature to make sure the exact same settings are applied to the entire series of images.
Next, open the images in an editing software like Photoshop. Start with the empty background image. Next, add in the main image of your model as a layer with a “Reveal All†mask. Simply use a black paintbrush on the mask to remove the props supporting your model. The end of this article describes each step in more detail. Repeat those steps for each frame you’d like to add. Finally, you can merge your layers and put the finishing touches on your final image. Then voila, you have a gorgeous piece of levitation art.
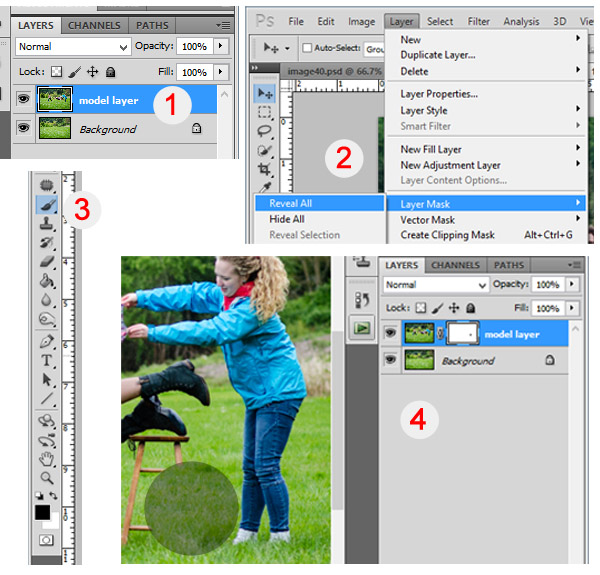
1 – Empty background shot is the bottom layer, with the model image above it. 2 – Select the model image and go to “Layersâ€> “Layer Mask†> “Reveal Allâ€. 3 – Select the paintbrush, make sure it is black. 4 – Simply brush over the props that you don’t want to show in the final image.
Creating levitation images lets your fantasies become “realitiesâ€. Don’t let the laws of physics prohibit you from creating true art For more inspiration, search 500px.com for levitation images. You’ll be amazed.
Your Turn
Have you tried creating a levitation photograph? What was your experience? Do you have any additional tips that would help those getting started? Let us know in the comments. Also, feel free to include a link in the comments to your levitation work. We’d love to see what you create!
Source Article from http://feedproxy.google.com/~r/DigitalPhotographySchool/~3/3MDl3QonFF0/


 Started out doing photography at the age of 6 using an uncle's old 1940 kodak brownie box camera. At 15 years of age, I decided to buy my very own 1975 Praktica SLR camera. I now shoot with a Nikon D850. I do unpaid TFP and commercial paid work.